Litewire Setup & Troubleshooting guides
Solutions For All Your Technology and Connectivity Needs
Your comprehensive guide to resolving connectivity issues, optimizing network performance, and Email configuration.

General Network Information
Improve Netflix Performance
If you’re experiencing buffering problems during Netflix playback, adjusting your video quality settings can significantly improve streaming performance.
How to Adjust Video Quality Settings
- Access your account settings
• Log in to www.netflix.com
• Click Account in the top right corner menu - Navigate to playback settings
• Scroll to the MY PROFILE section
• Click Playback settings - Select and save your preferred quality
• Choose your desired video quality level
• Click Save to apply changes
Choosing the Right Quality Setting
For Multi-tasking Users
If you plan to use your internet connection for other activities while streaming (such as web browsing or checking email), we recommend selecting Good quality. This prevents Netflix from consuming your entire bandwidth, which often causes re-buffering when other devices or applications access the internet.
Quality Settings and Bandwidth Requirements
Each quality setting uses the following approximate maximum bandwidth:
- Low quality: 700 kbps (0.7 Mbps)
- Medium quality: 1,500 kbps (1.5 Mbps)
- High quality: 7,000 kbps (7 Mbps)
- Ultra HD: Up to 16 Mbps
Note: Actual bandwidth usage varies based on content and playback device.
Recommended Settings by Usage
Multiple Devices or Basic Quality Needs
Choose Low quality if you:
- Stream on multiple devices simultaneously
- Prioritize uninterrupted playback over picture quality
- Have limited bandwidth
Optimal Picture Quality
Leave settings at default or choose the level just above your connection speed if you:
- Want the best possible picture quality
- Won’t use your internet for other purposes while streaming
- Don’t mind occasional buffering
Smart TV and Blu-ray Players
For internet-connected TVs and Blu-ray players, we strongly recommend setting a specific quality limit. These devices often attempt maximum quality regardless of your connection capabilities, resulting in poor streaming performance.
Pro Tips
- Test your connection: Check your download speed and set Netflix quality to the next level below your connection speed for optimal performance
- Remember: The rates listed are maximum rates, not fixed. Netflix automatically adjusts to the best quality it determines your connection can handle within your selected limit
- Leave bandwidth available: Setting quality below your maximum connection speed reserves capacity for other internet activities
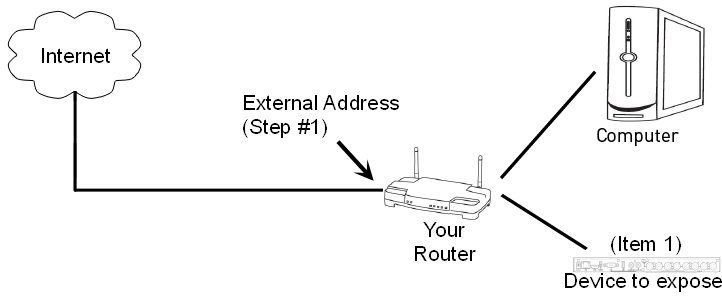
Port Forwarding With LiteWire
If you need to forward ports to a device on your network, follow these steps. Your LiteWire equipment acts as a router, which means your public IP address resides on the LiteWire equipment rather than on your router (as would be typical with other types of internet service).
Important Note
In these steps, you will be configuring your router to accept inbound connections by accessing your router’s settings from your PC. If you do not know how to access your router, please stop here and contact us for assistance.
Configuration Steps
1) Log in to your router’s setup.
2) Find the settings for the “Internet” or “WAN” interface and enter the following information:
-
IP Address type: Static
-
IP Address: 192.168.168.99
-
Netmask: 255.255.255.0
-
Gateway: 192.168.168.1
-
DNS: 192.168.168.1
-
Secondary DNS (optional): 199.38.168.49
How This Works
This configuration will effectively bypass NAT on your LiteWire antenna and forward all traffic to your router. You can then forward ports normally in your router’s configuration.
Automatic Configuration Option
If your router and console/device support UPnP (all current Xbox and PlayStation consoles support UPnP), it may be able to automatically forward any necessary ports. In this case, no further configuration would be needed.
For more information, please see Open/Moderate/Strict NAT How-to.
Important Restrictions
Some TCP/UDP ports, such as 80, 22, and 25, are restricted on residential service for security or management reasons and cannot be accessed.
Need Help?
If you are still having issues, please open a support ticket, and we will be happy to help!
Static IP Address Configuration
To access the service, you will need to configure your equipment correctly. If you have any trouble finding the correct settings, please contact us.
Note: YOU MUST COMPLETE ALL STEPS OR THE SERVICE WON’T WORK.
These instructions assume you are using a home router, but other configurations are possible. If you need more information or help with these settings, please let us know.
Things You Will Need:
1. Device IP Address
- Find this in your device’s network settings (Xbox, camera, etc.)
- Write down that number
2. Router Access
- Access to your wireless router’s settings
Important Background Information
You must tell your router to pass the connection on to the device you are trying to access from the internet. For example, an Xbox, camera, or video phone will have a “Local Area Network” (LAN) address. You must tell your router to pass data to that address.Security Options:
- Most Secure: Use “port forwarding” to pass specific ports to specific devices
- Simple Setup: Use “DMZ” to pass everything to one local device
Note: These instructions cover the DMZ method for simplicity. If you need to pass data to multiple devices or want to limit exposure, you’ll need port forwarding.
Configuration Steps
Step 1: Configure Router’s Internet Settings
In this step, you will set your router to accept inbound connections by accessing your router’s settings from your PC. If you don’t know how to access your router, please stop here and contact us for assistance.
1a. Log in to your router’s setup
1b. Find the settings for the “Internet” or “WAN” interface and enter:
- IP Address type: Static
- IP Address: 192.168.168.99
- Netmask: 255.255.255.0
- Gateway: 192.168.168.1
- DNS: 192.168.168.1
- Secondary DNS (optional): 199.38.168.47
Step 2: Configure DMZ Settings
In this step, you will configure your router to pass data to the IP address you collected in the prerequisites.2a. Find the DMZ settings in your router2b. Enter the IP address of the device you wrote down from Step 1 above
Congratulations, you are done!
Notes
- Router Only: The only changes required on your network are within your router
- Don’t Modify Devices: Do not make changes to the final destination (such as your Xbox or camera) unless you know why you are making those changes
- Advanced Users: May want to make additional changes depending on specific needs
Need Help?
If you have any questions or need assistance, please contact us.
LiteWire Antenna Internal Router IP Addressing Information
This guide explains IP addressing and advanced configuration requirements for LiteWire antenna systems.
Default Network
ConfigurationRouter Settings
- Gateway IP Address: 192.168.168.1
- Subnet Mask: 255.255.255.0
- Recommended DNS Server: 192.168.168.1
DHCP Address Range
The LiteWire antenna’s integrated router automatically assigns IP addresses in the following range:
- DHCP Range: 192.168.168.100 – 192.168.168.254
IP Address Allocation
Static IP Addresses
For devices requiring static IP addresses, use the following range to avoid conflicts:
- Recommended Static Range: 192.168.168.10 – 192.168.168.90
DMZ Configuration
- DMZ Address: 192.168.168.99
- Configuration: 1:1 NAT enabled by default from antenna’s public IP
- Usage: Use this address on your router for port forwarding or direct external access
Reserved Addresses
The following IP addresses are reserved for LiteWire services and should not be used:
- Reserved Range: 192.168.168.2 – 192.168.168.9
- Purpose: Additional LiteWire services (managed WiFi, Point-to-Point connections, etc.)
- Important: Using these addresses may cause conflicts with current or future LiteWire services
IPv6 Support
IPv6 is not currently supported but is planned for future implementation.
Configuration Summary
| Purpose | IP Range | Notes |
|---|---|---|
| Gateway/DNS | 192.168.168.1 | Router and recommended DNS |
| Reserved | 192.168.168.2-9 | LiteWire services only |
| Static IPs | 192.168.168.10-90 | Safe for customer use |
| DMZ | 192.168.168.99 | Port forwarding/external access |
| DHCP Pool | 192.168.168.100-254 | Automatic assignment |
LiteWire Color Codes & Network Management
Expected Speeds
The service level that you receive depends on your location within our network. Since we are constantly upgrading our network, the service level that you receive when you sign up may change in the future.
Please refer back here in the future, as this document will be updated to reflect the most current information available.
Once installed, please contact us to find out what service level you are in.
| Blue Service Level |
|
Starter
Advanced
Ultimate
|
| Green Service Level |
|
Starter
Advanced
Ultimate
|
| Red Service Level |
|
Starter
Advanced
Ultimate
|
| Silver Service Level |
|
Starter
Advanced
Ultimate
|
Listed data rates are the maximum speeds which connections are limited to. Actual speeds may vary depending on signal quality and other physical limitations of the individual connection. Set rates may be decreased at any time if it is required to improve network performance, or increased as network upgrades allow for improved performance.
Ultimate plan speeds limited only by network capacity and hardware capability. While speeds are not restricted, maximum rates will vary due to environmental conditions of your connection. The typical speed ranges listed for the Ultimate plan are an estimate of the range maximum speeds for an individual connection on that service level will fall within, some connections may not ever attain speeds at the higher end of that range.
The Starter plan is designed to provide good speeds for low bandwidth applications, such as normal web browsing or email. High bandwidth applications may not work well on the Starter plan, large downloads will take longer and should be scheduled during periods where other activity is not expected. Streaming video services (Netflix, Hulu, etc.) will be usable, but you may have to limit the number of streams and the quality. If your use case has trouble on this plan, please consider upgrading to the Advanced plan.
Please check this page for the most current information available.
Email Accounts and Supported Client Software
LiteWire provides email accounts upon request but does not provide end-user support for any email client or related issues. We do provide some limited support in via our troubleshooting guides here, but cannot assist you with other issues related to email.
There are many browser based options, such as Gmail and Mail.com, that provide free email accounts if the account we provide does not sufficiently meet your needs.
While there are many options (Safari, Microsoft Office, etc.), we generally recommend installing the free Thunderbird mail client.
The Thunderbird email program is available for free by clicking here.
Please see the “Mail Configuration” section below for email client setup instructions.
Email Configuration
Configure your email client with the following server information:
Server Settings
- Incoming Mail Server: mail.litewire.net (Protocol: POP3 or IMAP – see comparison below)
- Outgoing Mail Server (SMTP): smtp.litewire.net
- Outgoing (SMTP) Server Port #: 465 (located in advanced settings)
- While default port settings may function in some environments, we recommend using port 465 for reliable connections.
Authentication Settings
- Username: Your complete email address (e.g., example@litewire.net)
- Outbound Authentication: Must be enabled
- Use identical username and password for both incoming and outgoing server
- Connection Security: STARTTLS
- Authentication Method: Encrypted password
Important Username Requirements
Your username must include the complete email address with domain suffix (@litewire.net or @eishome.com). If your email password is repeatedly rejected or prompts appear continuously, verify that you have entered your full email address as the username.
Connection Type Comparison
Choose the appropriate connection type based on your needs:
| Feature | IMAP | POP3 | Website Login |
|---|---|---|---|
| Messages stored on server | ✓ | ✓ | |
| Messages stored locally | ✓ | ||
| Unlimited mailbox size | ✓ | ✓ | |
| Sync email across multiple devices | ✓ | ✓ | |
| Organize email in folders | ✓ | ✓ | ✓ |
| Device-specific application | ✓ | ✓ | |
| View all content types | ✓ | ✓ | ✓ |
Selecting the Right Connection Type
For multi-device access: Use IMAP or website login if you need to check email on various devices (phone, tablet, computer).
For email backup: Use POP3 if your primary concern is maintaining local copies of your messages.
Important considerations: Server-based email storage has capacity and retention limitations. For long-term access to older messages, POP3 is recommended as it stores messages locally on your device.
Most email clients support both POP3 and IMAP protocols, allowing you to choose based on your preferred features and usage requirements.
Mobile Phone Setup
Important Notes
- These instructions are optimized for Android devices but should work on all mobile platforms
- For Apple-specific instructions, visit: http://support.apple.com/kb/HT4810
- If you encounter issues, please let us know which step is causing problems
Setup Instructions
1: Go to your device settings and select “Accounts and Sync.” Choose “Add account” and set the account mode to “Other.”
Android Details: Navigate to device settings → “Accounts and Sync” → “Add account”
2: Enter your full email address and password, then select “Manual setup.”
3: Choose “POP3 Account” from the available account type options.
4: Configure Incoming Mail Settings
- Username: Your full email address
- POP3 Server: mail.litewire.net
- Port: 110
- Delete email from server: Never
Step 5: Press “Next” to confirm your incoming mail settings. The system will validate these settings and display an error if something is incorrect.
Step 6: Configure Outgoing Mail Settings
- SMTP Server: smtp.litewire.net
- Port: 587
- Require sign-in: Checked (enabled)
- Username: Your full email address
- Password: Your email password
Step 7: Select “Next” to finalize the configuration. The system will verify your outgoing settings and display an error if any issues are detected.
Configuring Email Filtering Rules
Email filtering rules help manage your inbox by automatically processing incoming messages. Examples are blocking someone you do not wish to be contacting you or maybe blocking all email coming to your @eishome.com address.
LiteWire supports both @litewire.net and @eishome.com domains. Both will continue to be available for existing users. If you prefer not to receive emails addressed to the @eishome.com domain, you can create filtering rules to manage these messages.
To set up email filtering rules:
- Login to https://mail.litewire.net
- Click the settings icon (gear symbol)
- Select “Content Filtering” from the menu
- Click “New” to begin creating a filter rule
- Enter a descriptive name in the “Name” field for your reference
- Configure the “Conditions” section to specify which messages the rule should affect
- Set the “Actions” section to define what should happen to matching messages
Rule Configuration
When creating rules, carefully consider both the conditions that trigger the rule and the actions that will be applied to matching messages. This ensures your email filtering works as intended while avoiding unintended message processing.
Using LiteWire Spam Controls
We all know that spam emails are a big problem. Without good spam blockers, email servers can get so overwhelmed they stop working properly.
There are two ways to block spam:
- Server-side – The email server blocks spam before it reaches you
- Client-side – Your email program blocks spam on your computer
You can use both, but generally it’s easier to pick one. This guide covers server-side blocking because client programs will come with their own instructions.
Getting Started
When using server-side controls, you will need to log in to your mailbox here: https://mail.litewire.net
Once logged into your mail, you will see a list of the messages currently in your mailbox. Right-click any message to open a contect menu. The center of the menu will list available spam controls.
Spam Control Options
TRUST SENDER
Use this to always receive emails from someone you trust. This skips all spam blocking for that sender.
BLOCK SENDER
This moves all future emails from this sender straight to your Junk folder. Note: This only works if the spammer keeps using the same email address.
CREATE CONTENT FILTER
This option will open a new screen with the following options:
Basic Settings
NAME – Give your filter any name you want so you can find it later.
MATCH TYPE – Choose “All” or “Any”:
“All” means every rule must match
“Any” means only one rule needs to match
Be careful not to make rules too broad, or you might block emails you want.
ENABLE WILDCARDS – Toggle on or off. This option controls whether you want to use pattern matching for controls. For Example:
pa* – matches any word starting with “pa” (like “pattern” or “path”)
pattern? – matches words with the same number of letters (like “patterns” or “pattern1”)
Setting Up Rules Using Conditions & Actions
NEW CONDITION – Conditions help to tell the system what emails to block. The system will suggest several conditions based on the email you selected. You can use these or make your own based on your needs. You need at least one condition for the filter to work.
Actions
NEW ACTION – Add an action to tell the system what to do when an email matches your conditions. For example, for spam, choose “Move Message” and select “Junk” folder.
As a note, rules can be used for more than filter spam, such as organizing email into folders by user. Just click the “?” in the black bar of the Action sub-window to get help for other use cases that are available.
Saving and Managing Filters
Click “Save” in the top left when you’re done. To change filters later, click the gear icon at the top of your email and select “Content Filtering.”
Enjoy a quiet email.
These tools are very powerful tools that give you complete control of the messages that end up in your mailbox.
Sending Bulk Email
LiteWire currently limits bulk outbound emails in an effort to control abuse of our system and protect its reliability for all users. If you need to send bulk content, we recommend checking into services such as Mailchimp (www.mailchimp.com) to assist with proper bulk email content.
At the time of this writing, there was a valuable article posted at the following link that might help getting started.
http://www.wpbeginner.com/showcase/best-email-marketing-services/
If you have any questions, please let us know!
Using Outside Email Domains
Due to the way spam is processed on the internet, there are certain restrictions that may affect your ability to send email if you are using a domain that is not hosted on our network, such as:
- Work email accounts
- Domain names hosted on other networks
If you’re unsure whether this affects you, please contact us for clarification.
The Problem
Email servers “read” every message that comes through to determine whether the message is legitimate or not. One method they may use is to check the email’s “postmark” to make sure it came from the server associated with your email address.
If your outbound server is not the same as your inbound server, this is seen as a strong red flag, and most receiving servers will toss the email as spam.
Solutions
Option 1: Move Email Hosting to Our System
Moving your hosting aligns your ingoing and outgoing servers – contact us for rates.
Option 2: Send Through Our Network with External Return Address
Change your email setup to show that the message comes from our network, but set the return address to your external mail domain.
Replies will be returned correctly, but your email will show that the email came from @litewire.net. This will allow your email to be delivered correctly but may not be the desired look or branding that you want.
Configure Secure SMTP with Your Current Provider ⭐ Recommended
Ask your email provider for a “Secure SMTP port” and how to set it up for their system.
This is the best choice because you’ll use your provider’s server directly, maintain domain branding and allow spam filters to see your email as properly “postmarked.”
Please note, some providers don’t offer this, so you’d need to use option #2 or switch providers.
Need assistance?
If you have questions, please contact us. However, we can’t help with setting up option #3 because each email provider has different settings. Your email provider should be able to help you set it up.
How Long Does LiteWire Store Email?
When using email @LiteWire.net and you are using a local email client such as Thunderbird (recommended), you are limited only by the capacity of your own computer.
Email stored there will be retained as long as you maintain access to the file on your computer. If you prefer to use our web-based mail interface as your primary mail interface, you should be aware that the server will regularly maintain data stored there.
The rules currently applied are as follows:
Deleted mail: Up to 10MB, Retained for 15 days.
Junk Mail: Up to 10MB, Retained for 12 days.
Sent Mail: Up to 10MB, Retained for 20 days.
Inbox: Up to 145MB, Retained for 365 days.
Note: These settings may be changed in the future without notice. Please check this item for updates.
If you have any questions, please contact us for more information.
Error Code: Potentially Dangerous Scripts Were Removed From This Message
When using the webmail interface, you will occasionally see emails that are not displaying correctly with a banner across the top that looks like this:
| Potentially dangerous scripts were removed from this message. |
This condition is the result of our mail server protecting itself from the kind of content that could be used in an attack. It is necessary in order to protect your email account from unauthorized access.
Note that the fact that the message was flagged does not state that it includes dangerous content. Instead it is simply not displaying that content, which could contain such an attack. Your email has not been changed, but you will not be able to view it fully unless you open it in a local mail client. One such email client is the freely available Mozilla Thunderbird application.
Mozilla Thunderbird can be downloaded for free here.
Please see the “Mail Settings” toggle above for email client setup instructions.
WiFi
Why Choose Managed WiFi?
We offer our “Managed WIFI” for those customers who are interested in an option where they do not have to maintain their own equipment.
You can start with one unit and add additional coverage later if needed, or you can start out guessing at necessary coverage and request multiple units. When requesting multiple units, we recommend professional installation.
If you need us to install the units (recommended if you are choosing multiple units), there is an additional $50 installation charge.
Advantages of choosing Managed WiFi:
- LiteWire will manage the configuration to make sure you are getting the best connection possible.
- Custom configuration is possible by contacting our support department with your needs.
- LiteWire will maintain the device(s) such that if they fail in the future, they will be replaced.
- With access to the router, we are able to troubleshoot connection issues that are otherwise necessary for the customer to perform themselves.
- Simplified support, due to our ability to test deeper than the outside of the customer’s router.
- Upfront costs are significantly reduced, especially if you desire professional installation.
Basic Router Setup
1. The cable coming from your LiteWire antenna’s power supply needs to be connected to the Internet or WAN port. (this is the same cable that was previously connected to your PC).
2. If you had a PC or other device connected directly to your LiteWire service, you can use a cat5/6 patch cable (usually included with your router) to connect one of the LAN ports on the router to your PC.
3. Most routers will work on their default settings, but you may wish to set up wireless security to prevent unauthorized access or customize other settings (you will need to refer to your user manual or contact the router’s manufacturer for help with your specific router).
When configuring your router’s internet connection type, select Automatic Configuration for the connection type (this may also be labeled as DHCP, Dynamic, or Cable Modem depending on the router). Do NOT select any internet connection types that require a username or password, such as PPPoE.
How to Bypass Your Router
There is a piece of equipment that was installed on your roof. A line was run from that equipment into your house and connects to your router, allowing you to create a wireless network.
If you want to test your connection by bypassing the router and your wireless connections, you can hardline your computer directly to the internet by following these steps:
- Go to your router. On the back of your router, there is a WAN port or Internet port. The WAN/Internet port is where the outside equipment connects to the router.
- After finding the WAN/Internet port on the back of your router, disconnect the Ethernet cable that is plugged into that slot.
- Connect the end of the cable that was just disconnected from the router directly into the Ethernet port on your computer.
- The router has now been bypassed, and the computer has a direct connection to the internet.
To test to see if hardlining to the internet was successful, open a new session in your browser of choice or test the activity that was previously having problems.
NOTE: Some computers do not automatically recognize the hardline connection. Disabling the Wi-Fi capability on the computer may be necessary. To do this, please consult your computer’s user manual.
Wireless Router Recommendations
Router Selection Guide for LiteWire Internet
In general, any standard wireless router from a reputable brand (Netgear, Linksys, Asus, etc.) will work well with LiteWire internet service. However, we do have some recommendations on what to look for and what to avoid when you’re shopping for a router to use with LiteWire Internet service.
What to Look For
Dual-band routers, which use both 5 GHz and 2.4 GHz, are best.
Look for WiFi 5 (802.11AC) or WiFi 6 (802.11AX) on the box. The faster speeds advertised on the higher-end routers are not necessary, as any 802.11AC or newer router will be able to handle higher speeds than your Internet connection. The pricier models might have extra features like better coverage or parental controls, but a basic router works just as well for internet speed.
What to Avoid
Avoid anything labelled a “modem” or router/modem combo. Those units are designed to replace the modem provided for cable or DSL internet services. Our service does not use a modem, and those units will not work.
Avoid “Tri-Band” routers. These routers use two 5 GHz Wi-Fi channels, which can interfere with the connection to our tower. In most cases, the secondary 5 GHz Wi-Fi channel can be disabled and work fine, but you’d be paying extra for functionality that you aren’t using and worsen performance.
Mesh and “Whole Home” WiFi Systems
If you are looking for a mesh or “whole home” type of Wi-Fi system, you need to be careful when selecting one for use with our service.
Why They Can Be Problematic
Many of these systems automatically pick their own radio channel and won’t let you change it. Sometimes they pick the same channel that LiteWire uses to connect to your house. When this happens:
- Your internet will randomly disconnect
- Your speeds will be slower
How to Fix Channel Problems
With regular routers, you can easily change the channel manually (LiteWire support will tell you which one to use). But many mesh systems won’t let you do this, so the problem can’t be fixed.
Problematic Systems
The systems from the brands listed below have been identified by us as being problematic for these reasons:
- Google WiFi
- TP-Link Deco
- Eero
Most older mesh systems also have this same problem. If you want a mesh system, make sure it lets you manually choose the WiFi channel before you buy it.
It is possible that the ability to manually set the channel could be added to these devices in future firmware updates, so I would recommend checking with the manufacturer if you have a device on this list.
Recommended System
The only mesh Wi-Fi system that LiteWire has tested and recommends for use with our service at this time is the Asus ZenWiFi AX Mini System, but we have not done an extensive review of the newer Wi-Fi 6 systems, and others may have the ability to manually configure the channel.
Quick Tips
- Stick with well-known router brands
- “WiFi 5” or “WiFi 6” is plenty fast
- Avoid modems and tri-band routers
- Be extra careful with mesh systems
- Call LiteWire support if you need help picking the right settings
LiteWire WiFi Channel Configuration Guide
The Problem
Your LiteWire internet and your home WiFi sometimes use the same radio frequencies. When this happens, they interfere with each other, causing slow speeds and connection drops.
The Fix
This is easy to fix by changing a setting on your WiFi router. By default, most routers will try select the “best” WiFi channel, but they will not detect the signal from the LiteWire antenna (because it’s not a WiFi signal) and will see that as a clear channel when it is not.
Channel Groups
To determine which WiFi channels you should use, you need to know your assigned “Channel Group.” Contact LiteWire support to find out which group (A, B, C, D, or E) you’re in.
Important: Your Channel Group can change over time, especially after LiteWire service calls where you might be switched to a different tower. If you start experiencing connection problems, verify you’re still using the correct channel settings.
Channel Group Settings
Once you know which channel group your connection is in, you can set your WiFi channel as indicated below:
Group A:
- Set your 5 GHz WiFi to Channel 36
- Leave 2.4 GHz on “Auto”
Group B:
- Set your 5 GHz WiFi to Channel 149
- Leave 2.4 GHz on “Auto”
Group C:
- Set your 2.4 GHz WiFi to Channel 1
- Set “Channel bandwidth” to “20 MHz”
- Leave 5 GHz on “Auto”
Group D:
- Set your 2.4 GHz WiFi to Channel 11
- Set “Channel bandwidth” to “20 MHz”
- Leave 5 GHz on “Auto”
Group E:
- You’re lucky! Leave everything on “Auto”
- No changes needed
Accessing Router Settings and Configuration
Most routers let you change these settings through:
- A web browser (type your router’s IP address)
- A smartphone app
Every router is different, so Google your router’s brand and model + “change WiFi channel” for specific instructions.
Router Type Considerations
Standard Single-Unit Routers
These work well with LiteWire and typically allow full manual channel control. Simply log into your router’s configuration interface and locate the wireless channel settings.
Mesh Systems (Whole-Home WiFi)
Limitation: Most popular mesh systems including Google WiFi/Nest, Eero, and Orbi don’t provide manual channel control. If these systems cause interference, the only solution is to replace them with a different WiFi system.
Workaround: Increasing physical distance between WiFi units and your outdoor LiteWire antenna may help but won’t completely solve the problem.
Recommended Solution: The ASUS ZenWiFi system (specifically the ASUS ZenWiFi AX Mini) is currently the only mesh system we’re aware of that provides full WiFi channel control.
Tri-Band Routers
The Challenge: These routers use two 5 GHz channels instead of one. For Groups A and B, one of these channels will likely conflict with your LiteWire connection.
Simple Solution: Disable the secondary 5 GHz channel completely. Most users won’t notice any performance difference since there’s typically little benefit to running dual 5 GHz channels.
Our Recommendation: While tri-band routers can work when properly configured, dual-band routers are simpler and avoid these complications entirely.
Additional Channel Group Information
If you need multiple routers (for extended coverage in outbuildings, large homes, etc.), here are the recommended settings:
Channel Group A
- Set channel bandwidth to 20/40 MHz (disable 80 MHz and 160 MHz options)
- Use channels 36 and 48 for your two routers
- Technical benefit: This provides two non-interfering 5 GHz channels while a 40 MHz channel will still exceed most internet connection speeds
Channel Group B
- Set channel bandwidth to 20/40 MHz (disable 80 MHz and 160 MHz options)
- Use channels 149 and 165 for your two routers
- Technical benefit: This provides two non-interfering 5 GHz channels while maintaining full internet speed capability
Troubleshooting and Support
If you’re experiencing problems:
- Verify your current Channel Group with LiteWire support
- Double-check your router’s channel settings
- Consider whether recent service calls might have changed your group
If this seems overwhelming: Contact LiteWire support for assistance. They can help identify your channel group and may be able to guide you through your specific router’s configuration process.
Remember: Proper channel configuration eliminates interference and ensures you get the full speed and reliability from your LiteWire connection.
LiteWire WiFi Setup Guide: Asus ZenWiFi AX Mini System
If you’re looking for a whole home or mesh WiFi system, LiteWire recommends the Asus ZenWiFi AX Mini System.
Unlike most mesh systems (like Nest/Google WiFi, Eero, or Orbi), the Asus system lets you manually set WiFi channels. This is crucial because it allows us to configure your system to avoid interfering with your LiteWire tower connection and optimize your performance.
Important: We recommend the ZenWiFi Mini (XD4) system specifically, rather than the larger models (XD8, XT8, or ET8). The Mini uses a “dual-band” setup instead of “tri-band,” which makes configuration much simpler. We’re still testing the larger systems before we can recommend them.
These instructions should work with other Asus router models too, but we’ve only verified them with the ZenWiFi Mini system.
Setup Overview
The setup process has two main parts:
- Initial Setup – Getting your system running (skip if already done)
- Optimizing Configuration – Setting the right channels for LiteWire
Initial Setup
Quick Setup (Smartphone/Tablet)
If you’re using a smartphone or tablet, you can use the ASUS Router App and follow the Quick Start Guide that came with your system.
One important note: When asked “Does your Internet connection require a username and password?” – select “No”.
Detailed Setup (PC/Mac/Laptop)
If you need more detailed instructions or you’re using a computer, follow these steps:
Step 1: Physical Connections
- Get out all three ZenWiFi units and power them up
- Find the main router unit (it has a blue “WAN/LAN” port plus the regular “LAN” port)
- Connect the “WAN/LAN” port to the “PC/Router” port on your LiteWire power supply using the provided cable
Step 2: Connect Your Setup Device
Choose one method:
- Wired: Plug your computer into the “LAN” port on the main router unit
- WiFi: Connect to the new network (likely named something like “ASUS_20”)
Note: You might see warnings about unsecure network or no internet – that’s normal, just stay connected.
Step 3: Browser Configuration
- Open your web browser and go to http://192.168.50.1
- Click “Create A New Network”
- Make sure your other ZenWiFi nodes are within 10 feet of the router, then click “Next”
- If prompted about the WAN connection, connect it to your LiteWire power supply
- When asked about username/password for internet connection, select “No”
Step 4: Network Settings
- Create your WiFi name and password:
- Choose any network name you like
- Password must be at least 8 characters
- Write these down somewhere safe!
- WiFi 6 mode: Keep this enabled unless you have very old devices that might have compatibility issues
- Router login: Create a username and password for router management (you’ll need this later)
- Firmware upgrade: We recommend doing this now – it takes a few minutes but ensures you have the latest features
- Final step: Review your settings and reconnect your device to the new WiFi network if needed
Optimizing Configuration (Critical Step!)
Step 1: Get Your Channel Group
Before you start: Contact LiteWire support and ask for your Channel Group (A, B, C, D, or E). This determines which channels you need to use.
Step 2: Channel Settings by Group
Set your channels based on your assigned group:
- Group A: Set 5 GHz to Channel 36 (may show as 5180 MHz or 5.18 GHz). Leave 2.4 GHz on “Auto”
- Group B: Set 5 GHz to Channel 149 (may show as 5745 MHz or 5.745 GHz). Leave 2.4 GHz on “Auto”
- Group C: Set 2.4 GHz to Channel 1 with “20 MHz” bandwidth. Leave 5 GHz on “Auto”
- Group D: Set 2.4 GHz to Channel 11 with “20 MHz” bandwidth. Leave 5 GHz on “Auto”
- Group E: Leave everything on “Auto” – you’re all set!
Step 3: Apply the Settings
- Open your web browser and go to http://192.168.50.1
- Sign in with the router username and password you created earlier
- Click “Wireless” under “Advanced Settings” on the left side
- At the bottom, find “Control Channel” and “Channel Bandwidth” settings for both 2.4 GHz and 5 GHz
- Set them according to your Channel Group
- Click “Apply”
Where to Buy
You can purchase the Asus ZenWiFi AX Mini System through Amazon, Best Buy, or other major retailers.
That’s it! Your WiFi system should now be optimized for the best possible performance with your LiteWire connection. If you run into any issues, don’t hesitate to contact LiteWire support.
Change Cisco/Linksys Wireless Router Channel
Interference is one of the most common Wi-Fi problems. This can happens because of distance or location, other home electronic devices, neighboring Wi-Fi, and physical obstructions like walls, mirrors, or glass. Changing your router’s wireless channel can fix this problem and make your Wi-Fi work better.
The steps below show you how to change the wireless channel on your Linksys router using the web setup page. To do this using your Linksys cloud account, click here.
Step 1: Access the Router’s Web-Based Setup Page
Go to http://192.168.1.1 in your web browser. If this works, you’ll see a login screen. If you get an error message instead, the address is wrong for your router. [Click here for help finding the right address].
Step 2: Navigate to Wireless Settings
On the router’s web-based setup page, click the Wireless tab.
NOTE: Images and options may vary depending on your router’s model.

Step 3: Configure Basic Wireless Settings
On the Basic Wireless Settings tab, select Manual. This lets you pick your own wireless channel. When done, click Save Settings.

Some newer routers don’t have a Manual option. Simply click Wireless > Basic Wireless Settings, locate Wireless Channel, and use the drop-down menu to make changes.

QUICK TIP: If you are using a simultaneous dual-band router, you need to complete this process for both 2.4 GHz and 5 GHz frequencies.
Step 4: Set Channel Width
Select 20 MHz for the Channel Width for both the 5 GHz network and the 2.4 GHz network.
QUICK TIP: To avoid interference with other 2.4 GHz networks in your area, Channel Width should be set to 20 MHz Only for both frequencies.
Step 5: Select Your Channel
Click the drop-down arrow for Channel, then select the channel provided by LiteWire Support. If you have not yet been assigned a channel, please open a support ticket to request one.
Step 6: Save Your Settings
Click Save Settings to apply your changes.
More information on Linksys Routers can be found here.
Change Motorola Wireless Router Channel
To change the channel on most Motorola wireless routers:
1. Open up a browser (Internet Explorer, Firefox, Safari, etc.) and type in the following URL: http://192.168.10.1
2. You should see a screen requesting a username and password; type the Username as admin, and the Password as motorola. Then click OK. (these are the defaults; if you have done previous configuration on your router, the password may be different)
3. Click the Wireless button. (There should be a row of buttons for various settings either across the top of the page or on the left side, depending on your router version).
4. Select the desired channel in the Channel Number dropdown menu.
If you do not see the Channel number dropdown, click the Basic tab at the top of the screen (this may not exist on all models).
5. Click the Apply button to save your settings.
The complete user guide for Motorola WR850 routers can be found here.
Support for Motorola Devices can be found here.
Change Netgear Wireless Router Channel
Step 1: Log in to the wireless router at its default LAN address of http://192.168.1.1 or http://192.168.0.1 (depending on the model) with its default user name of admin and default password of password, or using whatever LAN address and password you have set up.
Step 2: Select the Wireless Settings in the main menu.
Step 3: Set the channel desired channel.
Step 4: Click the Apply button to save your settings.
LTE Modem Connection
The following information applies to you only when directed by LiteWire staff. If you were not sent to this page, these instructions do not apply to your setup.
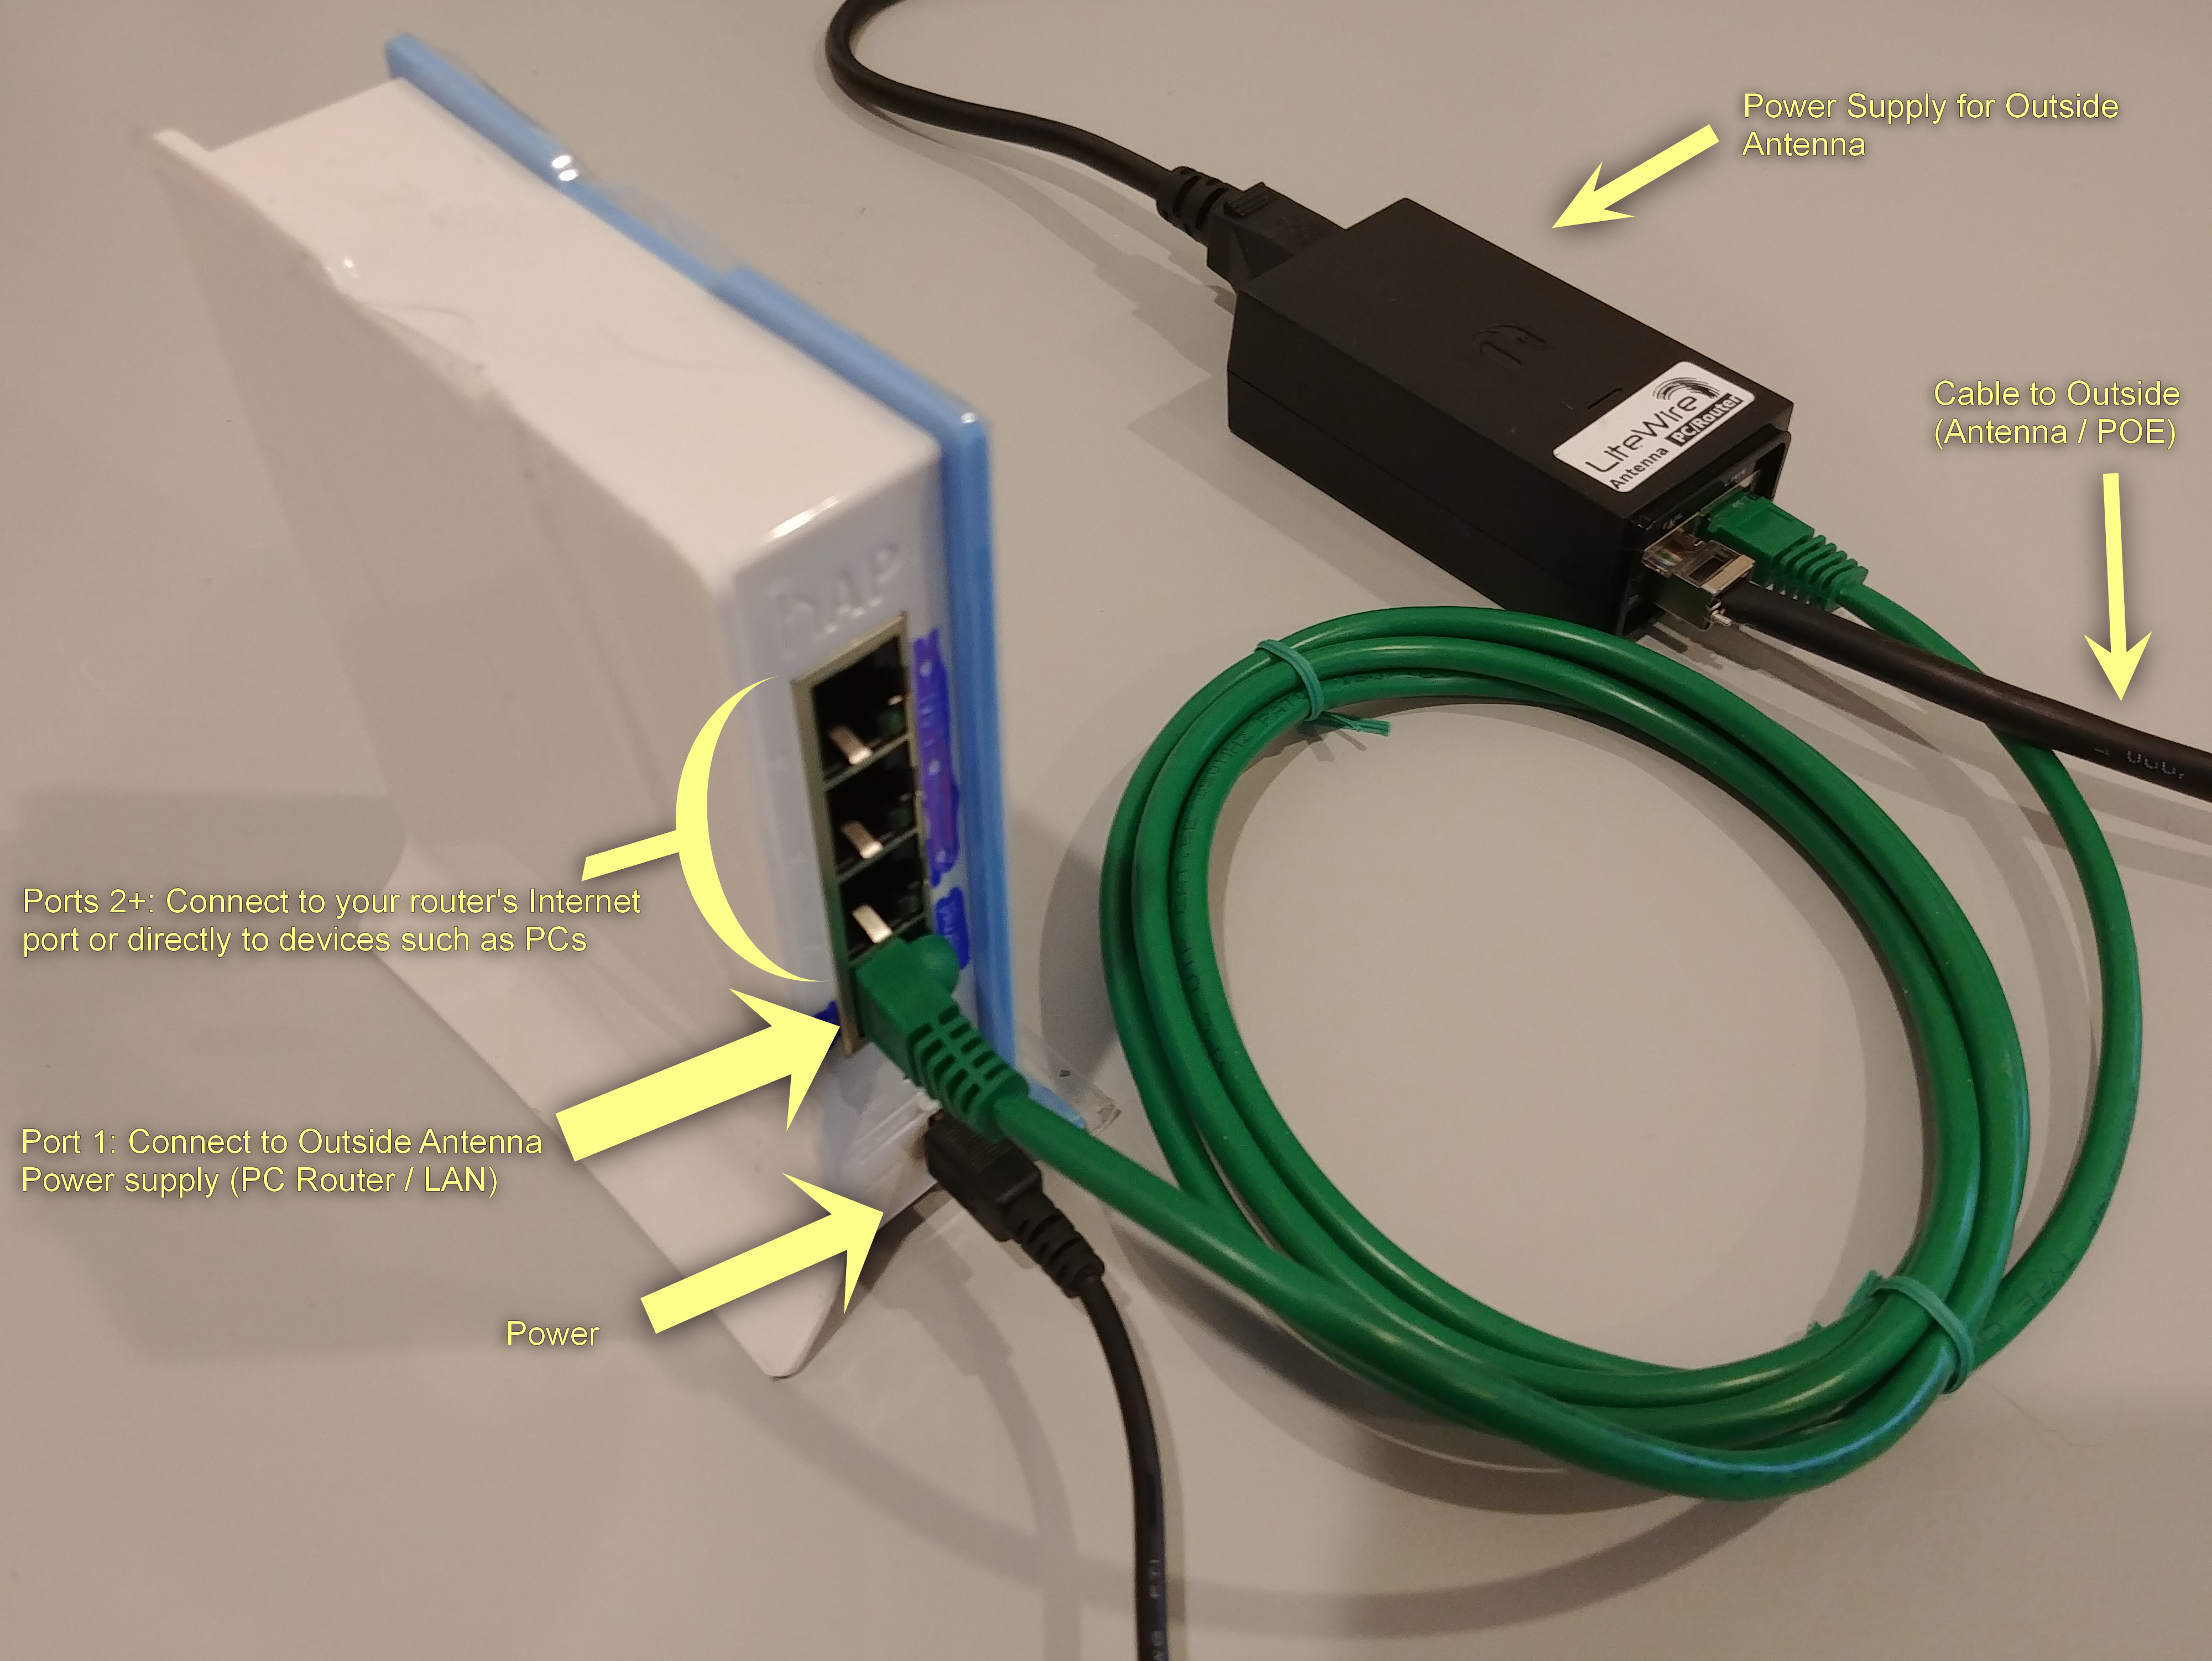
You have been given a device (“LiteWire hAP”) to connect inside your home. The device is required for internet access, so until it is connected correctly, your internet service will not function.
Instructions:
- Connect the wire from outside to Port #1, labeled “Antenna” and/or “Internet”, on the LiteWire hAP.
- Connect the wire from your router’s “Internet” port to one of the numbered ports on the LiteWire hAP. (Cable not shown in image below)
- Connect power to the LiteWire hAP.
- Confirm all connections per the photo below.
Helpful Resources
Support Tools
- Internet Speed Test
- Troubleshooting Guides
- Wi-Fi Setup Instructions
- FAQs
- Broadband Labels
- Outage Information
Forms and Policies
Additional Links
Need Assistance or More Information?
We’re here to help you make the most of your LiteWire High Speed Internet experience. Whether you need troubleshooting support or want to explore our range of resources, our team is ready to assist. Don’t hesitate to reach out or discover the tools available to enhance your connection.